GelMoment gel polish is a high quality product you can trust. However, as with any new product, there can be a learning curve when it comes to perfecting your application. That’s where this GelMoment Troubleshooting Guide will come in handy!
In my experience as a distributor, and as a certified Nail Technician, I have helped many women troubleshoot their application process to get the best experience with GelMoment gel polish. Below you’ll find a number of common issues first time customers experience. You can also read about some Gel Polish Do’s and Don’ts that will help you if you’re experiencing any challenges with your GelMoment product. I want you to have the best experience and a long lasting GelMoment manicure!
If you find that your GelMoment polish isn’t lasting as long as you’d like, try some of the following tips. Almost always, the problem can be easily resolved!
Tip #1: Start with a Clean, Dry, Oil-Free nail plate.
No nail covering will adhere to a nail plate properly if there are oils present. This would apply to regular nail polish, acrylics, gel polish, etc. So if your GelMoment polish is peeling, it could be a sign that your nail plate had oil present at the time of application. The picture below shows an example of how the polish will look as it’s being applied on nail plate with oils present. You know how olive oil and water don’t mix? It’s the same with Gel Polish and oils on the nail plate.

The best results in my experience have come from following these steps to prepping the nail plate.
1. Wash your hands with a de-greasing soap, like Dawn dish soap.
2. Thoroughly dry your hands and nails.
3. Using the spongy, gray side of the GelMoment buffer/file combo, lightly and evenly buff the nail plate, being sure to get down into the nail folds and don’t forget the free edge/tip of your nail. (It is important to remember not to buff too much – a very light touch will suffice.)
4. Using the GelMoment cleansing wipe, thoroughly cleanse the nail plate to remove any debris from buffing, and any oils remaining on the nail plate.
5. Allow nails to air dry for a minute or two prior to beginning your polish application. (And be careful not to touch anything while you wait!)
Tip #2: Apply GelMoment gel polish in THIN coats.
With gel polish, it’s important to ensure a proper cure. If GelMoment gel polish is applied in coats that are too thick, they will not achieve a full cure. This can lead to bubbling, peeling, and chipping. It also can leave you at risk of developing an allergy from contact with uncured gel polish.

It’s imperative to ensure you are using the correct curing time, and the correct lamp. GelMoment lamps are formulated and tested to work specifically with our polish. So, if you’re using an off-brand lamp and not experiencing the expected results with your GelMoment gel polish, invest in a GelMoment lamp. (They are guaranteed for Life!) Also, double check your hand/finger placement while curing. Your hand and nails should be flat and level.

So how do you know if the coats of polish you’re applying are thin enough to get a full cure? A good rule of thumb is to start with a nearly dry brush. Your goal is to not get full coverage in one coat. It’s better to apply two thin coats for coverage. The picture below shows an example of a good, thin coat of polish, and a coat of polish that’s too thick. It also shows the amount of polish you should have on the brush. A little bit goes a long way!

Tip #3: Be sure to cap the free edge.
What does this mean? Make sure to pull the polish all the way to the front edge of the nail plate, over the tip. Then run the brush horizontally along the front of the tip of your nail.
Leaving the free edge of the nail plate exposed leaves your nail open to water and other liquids to absorb into the nail plate, which may dehydrate the nail and change it’s shape. This fluctuation in the nail plate will affect your manicure’s longevity, because although your nail will flex, the polish will not.
Gel polish is self leveling and will shrink before curing, so capping the free edge should be the last step before you cure. Also, if your polish is shrinking quicker than you can work, cure just two nails at a time, even if you are using the GelMoment Professional 4-Finger lamp. Use a very small amount of polish to cap the edges to avoid a noticeable ridge of thicker polish in your finished manicure.

Tip #4: Avoid getting GelMoment gel polish on the skin and cuticles.
When painting your nails, be sure to not have too much polish on your brush. Applying excessive polish to the nail plate can cause the polish to flood the cuticle and sidewall areas. You want to leave approximately a 1mm gap between the edge of the polish and the cuticle/sidewall. This is the ideal distance, and allows your manicure to ‘last’ as long as possible without looking outgrown.
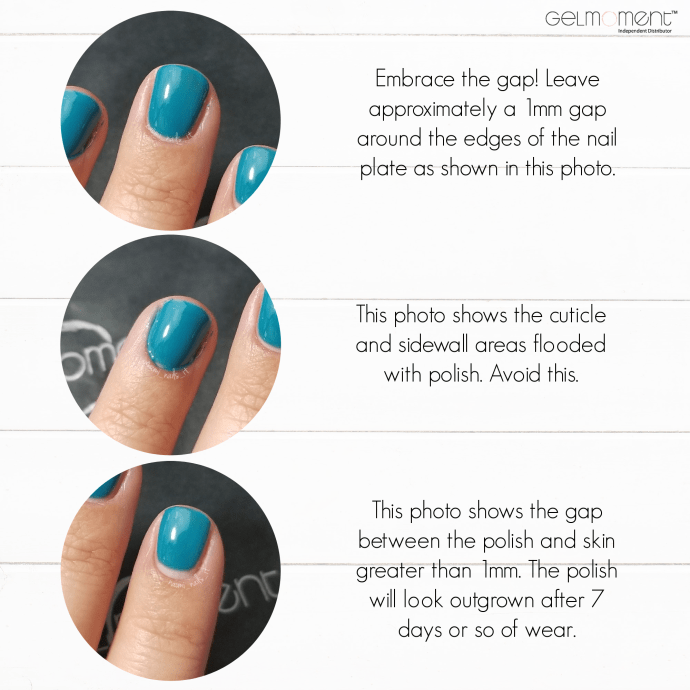
I recommend starting with the polish brush in the center of the nail plate, and pushing back towards the cuticle. From there, swipe down either side of the nail to cover completely. Finish by capping the free edge of the nail. See figure below.

Perfecting your application will take some practice, but it’s a skill you’ll keep for a lifetime!
If you’ve followed the GelMoment Application Process and the advice given here in this GelMoment Troubleshooting Guide, your GelMoment Application should be flawless, and your manicure should last up to 14 days, if not longer! Especially if you’re diligent with using your Cuticle and Nail Oil. You can go here to read more about Why Cuticle Oil is Important.
If you’re still having issues, please feel free to reach out to me for one-on-one troubleshooting. As your distributor, I want you to be happy with your product, and enjoy the same long-lasting gel manicures that I do!